

How to Measure Pharyngeal Constriction Ratio (PCR)
Pharyngeal Constriction Ratio (PCR)
PCR measures maximal pharyngeal constriction. To obtain PCR, two pharyngeal area (PA) measures (PA Hold, PA Max) are collected. The two measures are used to calculate the value of PCR (PA Max/PA Hold).
PCR = PA Max / PA Hold
PA Max: the area of contrast/air within the pharynx at maximal pharyngeal constriction during a swallow of any bolus.
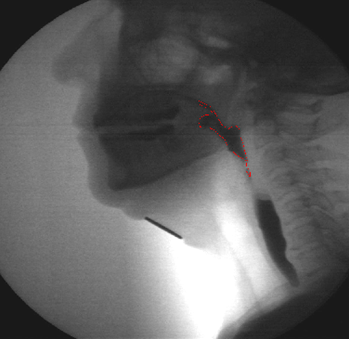
PA Hold: a reference measure of the area of the pharynx at rest, when holding a small bolus (1 mL or 5 mL thin liquid) in the mouth. It is used as a constant for calculating PCR.
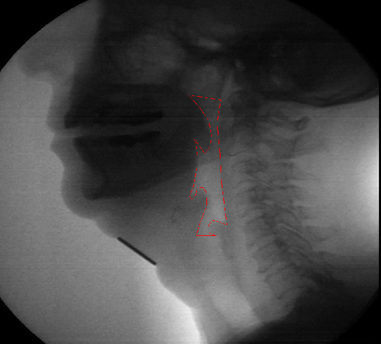
Step 1: Identify and Measure PA Hold
1. Identify the 1mL thin liquid trial
• If required, a 5mL thin liquid clip may be used instead.
• Note: measuring PA Hold while the patient is holding a small (1mL or 5mL) liquid bolus reduces spontaneous oral movement without altering the pharyngeal area
2. Identify anatomical landmarks 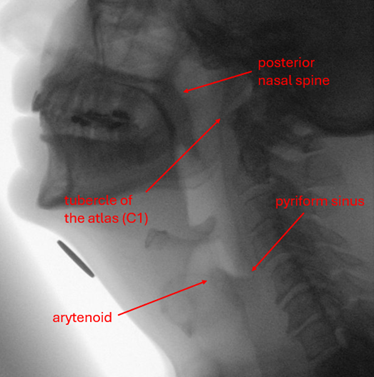
• Posterior nasal spine
(play the clip to identify where the movement of the palate is initiated during palatal elevation, aka the “knuckling of the soft palate”)
• Anterior tubercle of the atlas (C1)
• Pyriform sinuses
• Arytenoids
3. While the bolus is held in the oral cavity, identify the pharynx at rest
• This will occur prior to initiation of the swallow.
• Identify the frame where the bolus is held still by the tongue and remains in the oral cavity, but before the tongue begins to drop for oropharyngeal transfer.
4. Trace the pharynx at rest
• Start at the posterior nasal spine and move across to the posterior pharyngeal wall at the level of the tubercle of the atlas (C1).
• Trace downwards along the posterior pharyngeal wall to the pyriform sinuses.
• Trace around the inner curve of the pyriform sinuses, then up to the arytenoids.
• Trace just over the arytenoid apex and then horizontally to the thyroid cartilage.
• Then, trace upward following the line of the laryngeal vestibule toward the epiglottis.
• Trace around the epiglottis, including as deep in toward the epiglottic petiole as is visible, then trace upward and inward along the tongue base until the point where it contacts the velum. (If the velum does not make contact with tongue base, trace to the narrowest point between the structures; do not trace anterior to the posterior nasal spine)
• Trace around the velum.
• End the measure at the posterior nasal spine, where tracing began.
Step 2: Identify and Measure PA Max
The second step is to identify and measure PA Max, as follows:
1. Select the clip for the trial you wish to measure
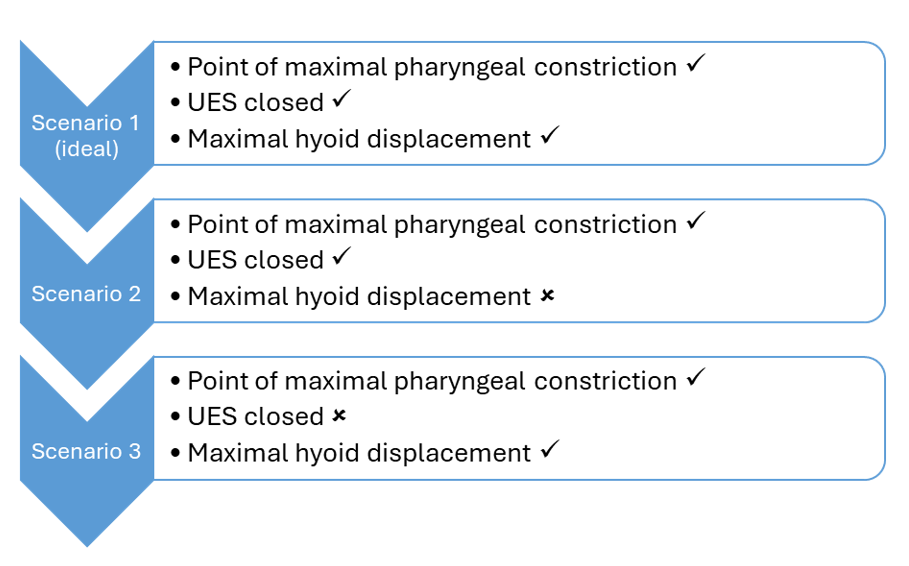
2. Identify the pharynx at maximal constriction
• Look for the frame where the pharynx is most constricted during the swallow.
o Ideally this will occur after the UES closes and before the initial descent/relaxation of the larynx/hyoid bone (i.e., at the maximal hyoid displacement) (often, the correct image can occur across multiple frames).
• If piecemeal deglutition occurs, identify the point where the largest bolus quantity was swallowed, and measure the corresponding frames.
PA Max – Frame Selection Hierarchy
2. Measure PA Max
• Trace the area within the pharynx that is not constricted, which may contain residual contrast (bolus) and/or air. Be sure to trace the entire area. (This area may be very small if the pharynx is fully constricted)
• If there are multiple areas within the pharynx that are not fully constricted, create a connecting line between the two areas and retrace the connecting line precisely to minimize the amount of additional area included in the final measure. The connecting line will ensure that all separate areas are included in the calculation.
• Do not trace anterior to the posterior nasal spine.
• Do not trace within the laryngeal vestibule.
• Do not trace within the UES.
Step 3: Calculate PCR
Once the areas for PA Hold and PA Max have each been determined, use the following formula to calculate PCR:
PCR = PA Max / PA Hold
Additional Information
Setting up the Videofluoroscopic Swallowing Study (VFS)
When collecting VFS data, tape a calibration object to the underside of the participant’s chin. Ensure the calibration object is round and metal, and of a known diameter (e.g., a Canadian quarter – 2.38cm; US penny – 1.905cm; a ball bearing of 1cm).
This will act as a reference point for anatomical calibration (i.e., to determine the dimensions of area for a given individual by comparing it to an object of a known size).
Measuring PCR in SwallowTail*
Calibration
The VFS video must be calibrated before completing area measures. Follow these instructions to calibrate the video in SwallowTail:
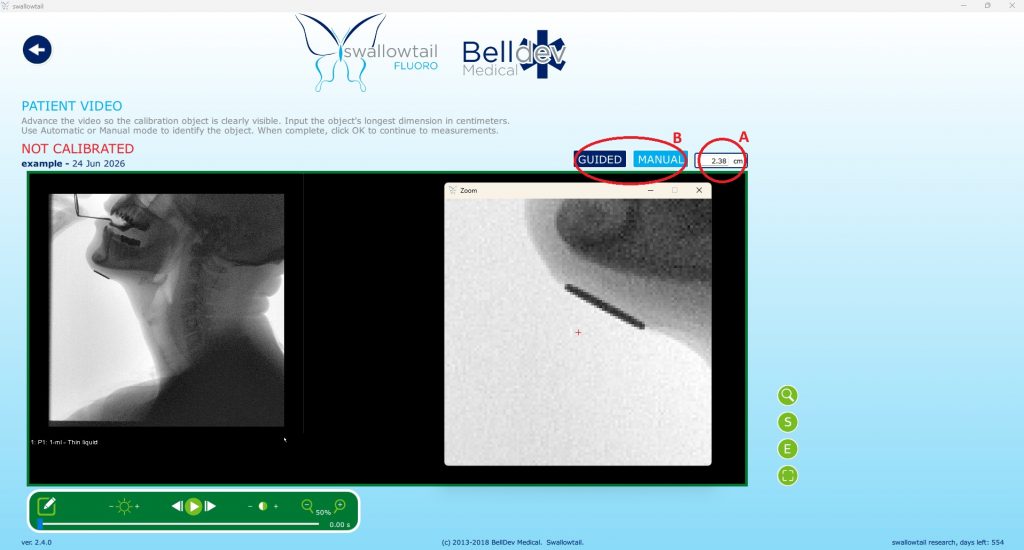
- Open the video in SwallowTail; the calibration screen will appear.
- Input the known reference measurement (e.g., 2.38 cm) in the top right field (A).
- Select either the guided or manual option for calibration (B), and measure the calibration object accordingly:
- Guided: hover your cursor over the object and click when the blue circle appears, taking note to ensure the blue circle accurately detects the object.
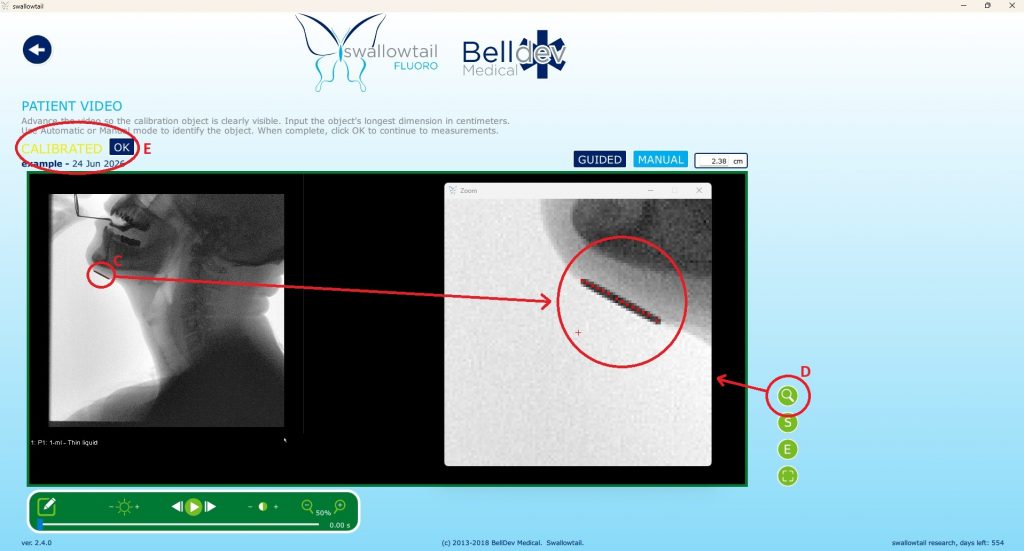
- Manual: click the calibration object at your beginning point, then hold the curser and drag it across the object (C). Use the zoom function (magnifying glass icon) to optimize precision (D).
- Right click to undo your line, if needed.
- Once calibration is complete, click OK; you will be taken to the measurement screen.
Obtaining Measurements
To obtain the above measures using SwallowTail, follow these instructions:
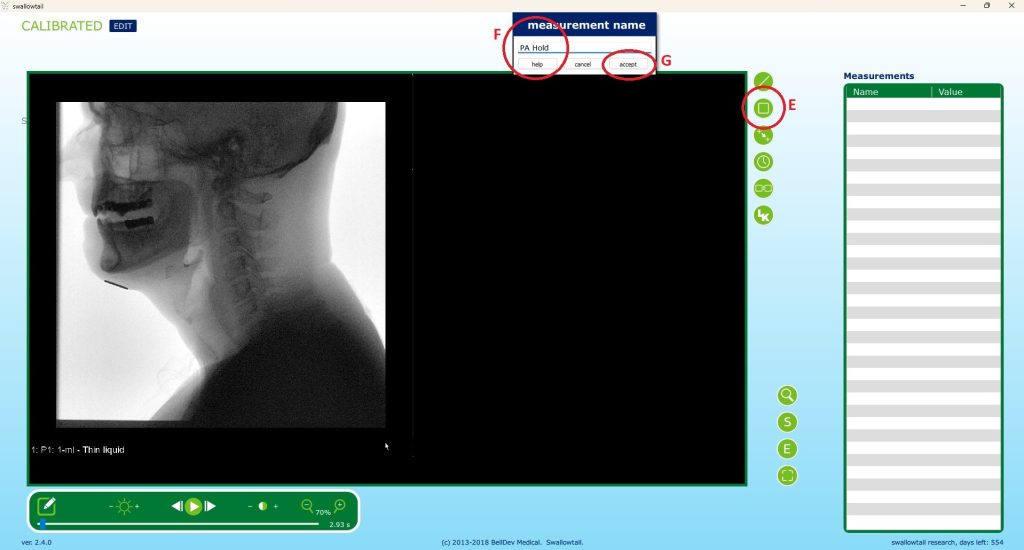
- Click on the area measurement icon (E).
- Write down the measurement name (e.g., PA Hold, PA Max) in the measurement name box (F).
- Click accept (G).
- Taking the measure:
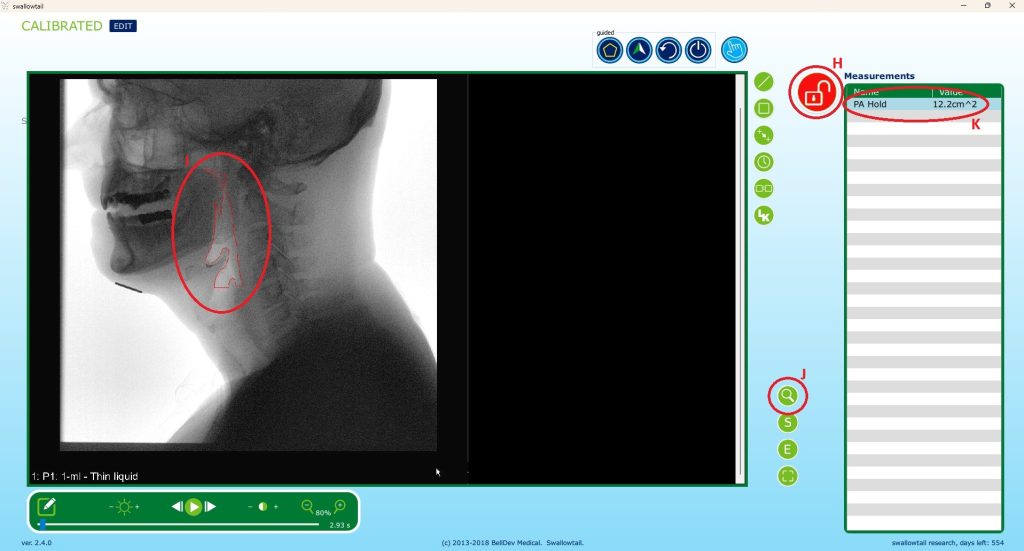
- When you first accept the area measure, a red lock will appear, showing that the measure is unlocked/editable (H).
- While the area measurement is unlocked, trace the outline by clicking around the perimeter (I); click as many points as needed to accurately capture the area.
- Use the zoom function (magnifying glass icon) to optimize precision, if needed (J).
- Once you have traced the entire perimeter, the final selected point (click) should be on or near the starting point of the tracing; by carefully enclosing the tracing, the area will be accurately captured.
- The value of the area will appear in the value column, under measurements, on the right side of the screen (K).
- Editing the measure:
- While the measure is unlocked, right click to undo the most recent perimeter point. If needed, continue right clicking to deselect previous points one-by-one. Then, repeat step 4.
- Locking the measure:
- To lock the measure, click the red lock button. The measure is locked (unable to be edited) when the button shows as green.
- If you need to edit the measure, click the green lock button to unlock it.
* Swallowtail version 2.4 (Belldev Medical, LLC) is based on the quantitative measurement methodology developed by Dr. Rebecca Leonard and Dr. Katherine Kendall at the University of California, Davis.